
For beginners, the editing steps in digital infrared photography are unfamiliar and foreign. Without a guide, it is difficult to achieve the desired result. Nevertheless, infrared post-processing is not witchcraft and once you have internalized the steps bit by bit, it can be done quickly and easily.
Without any infrared post-processing?
Before we get deep into channel swapping, white balance and contrast adjustments, something has to be said beforehand: Infrared photography means intensive processing especially if you want to end up with a color infrared or ColorKey. For pure black and white infrared processing, minimum to no processing is needed, if you don't want that. If you set an approximate white balance in camera and change the image profile to monochrome, you can be happy with JPEG files straight out of the camera. And there's nothing wrong with that. The point is to enjoy photography, after all, and every photographer has different priorities and different approaches.
For all those who would like to go deeper into (color) IR photography, I recommend reading on.
White Balance in Infrared Photography
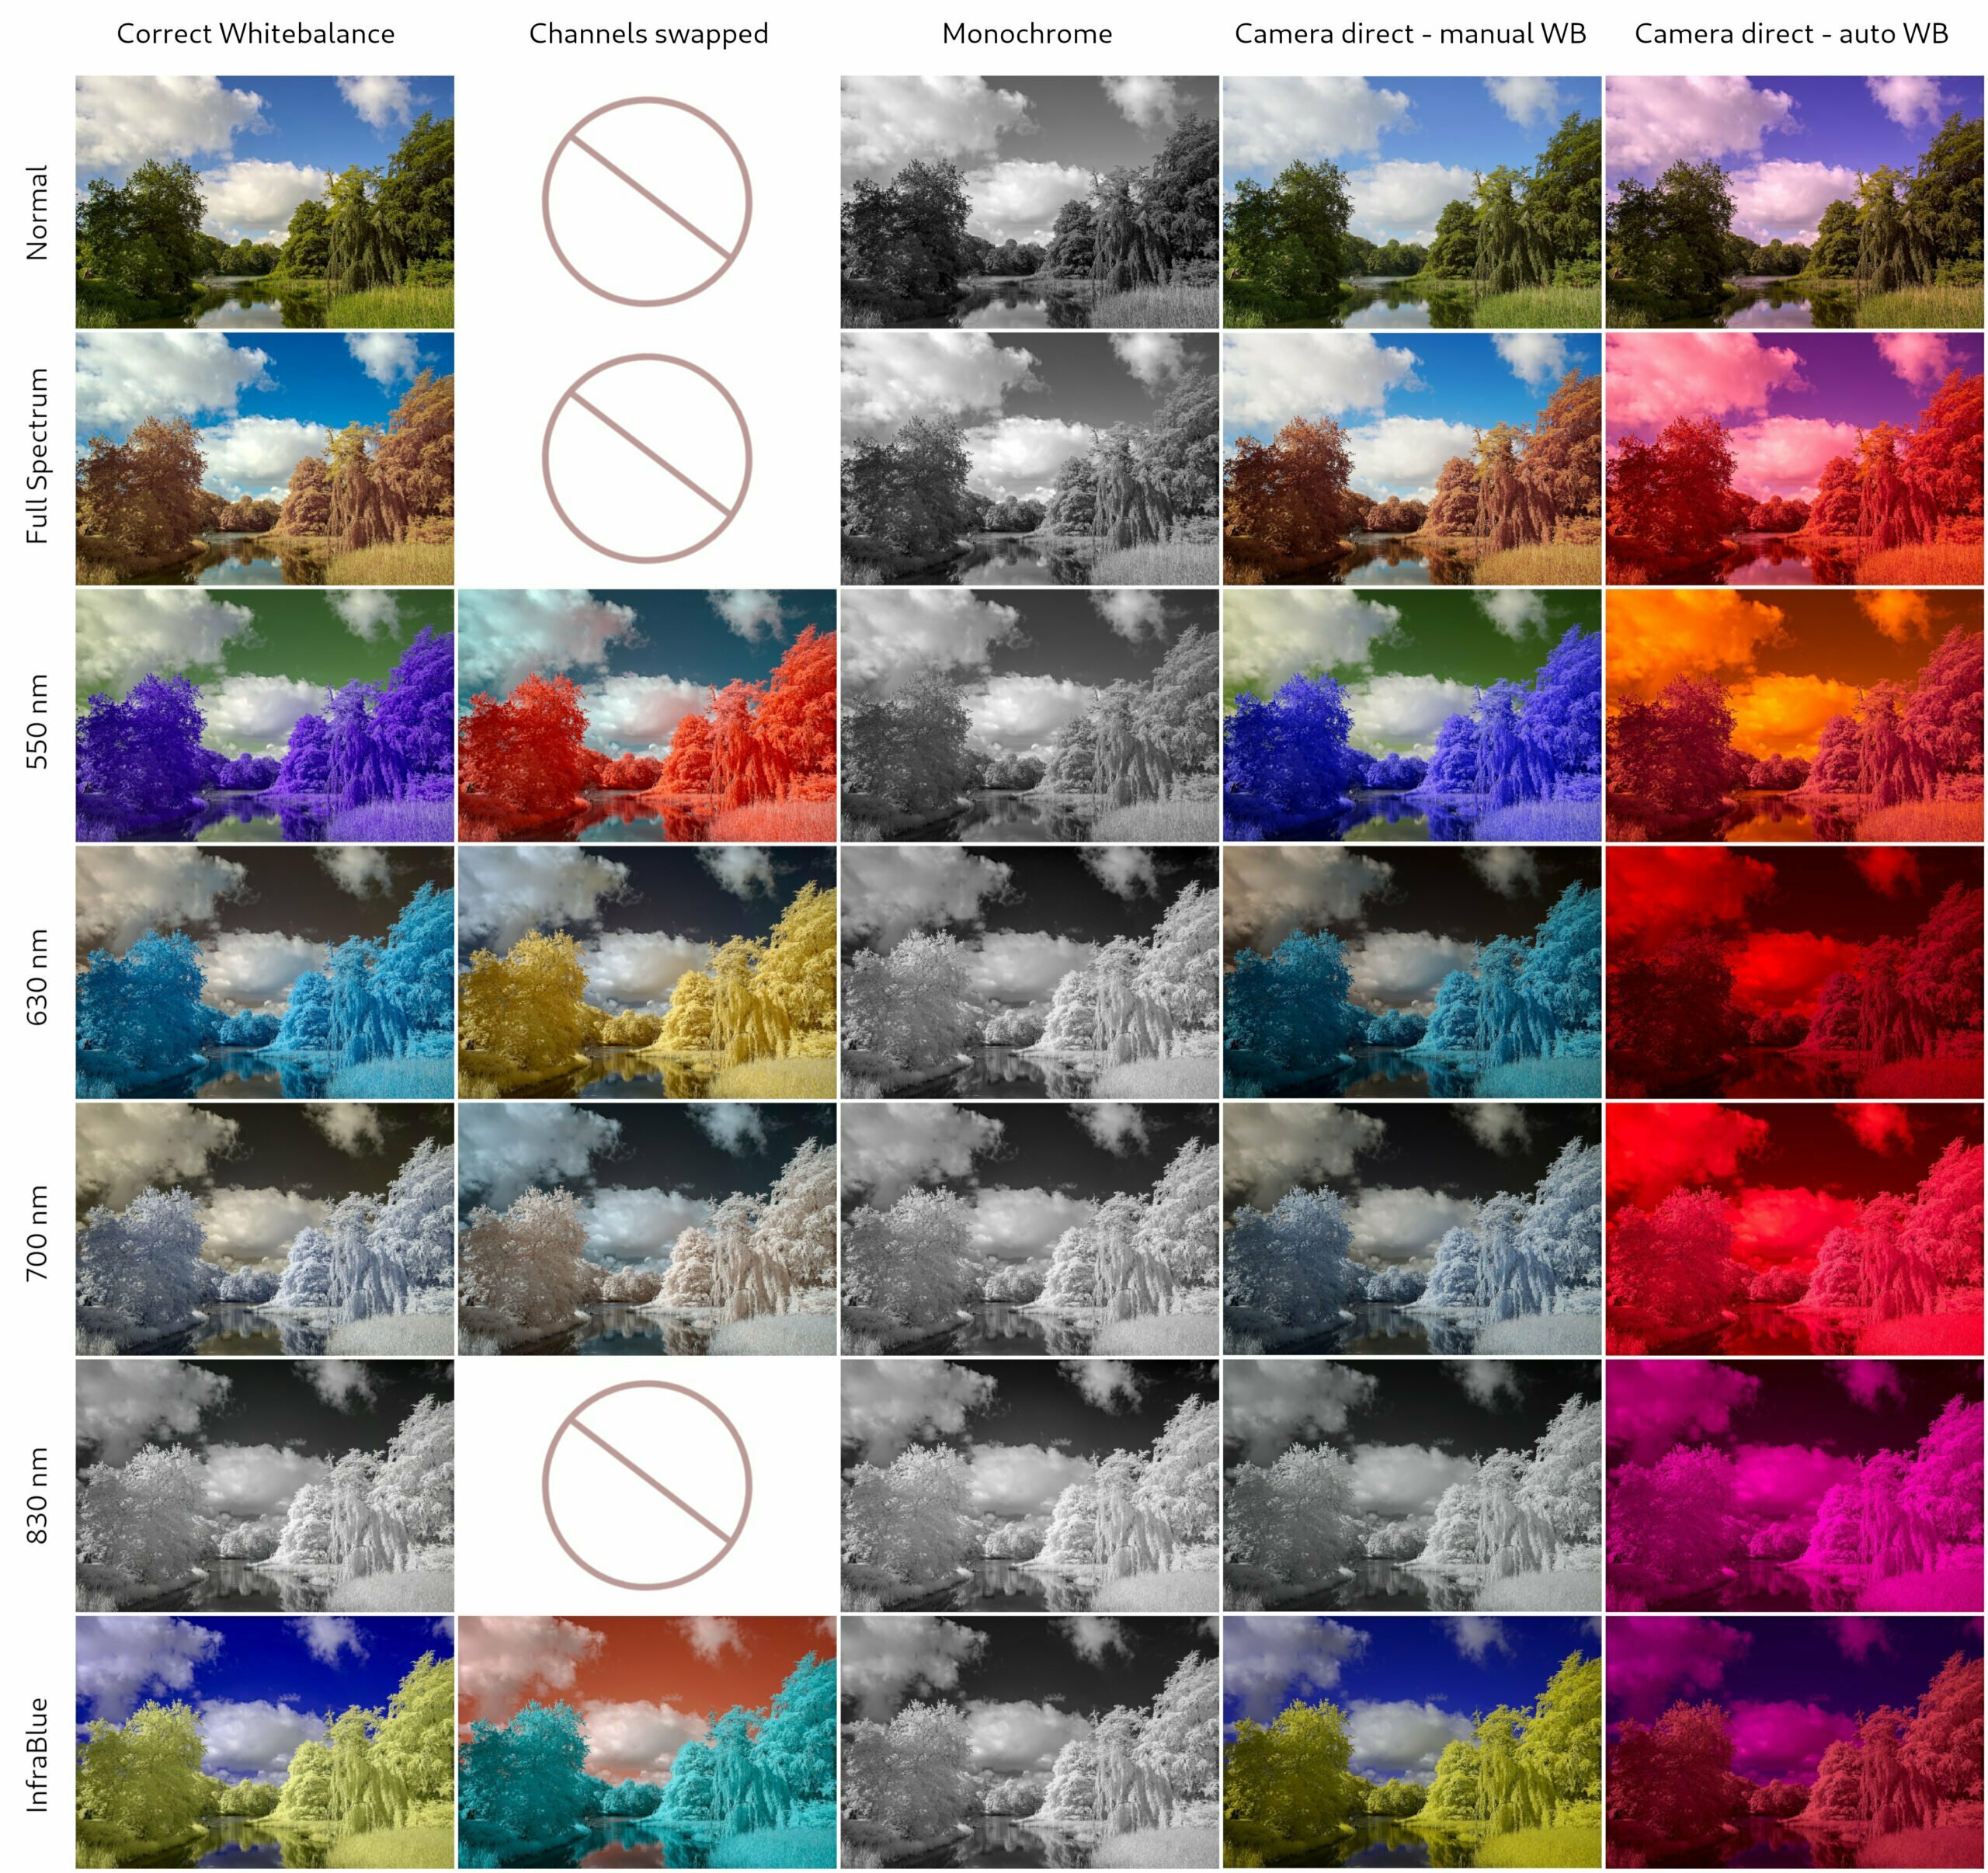
Even if you can work with the JPEG files from a converted camera, it is not advisable, especially for color-infrared images. I always recommend to shoot in RAW format to be able to fine-tune exposure and most importantly white balance on the PC. A digital infrared image requires a rather extreme white balance where the red channel is lowered and both blue and green channels have to be boosted. This can be done easily from a RAW file, but not from an 8-bit JPEG file. Even if the white balance has already been set correctly in the camera, tonal gradation can still occur.
You often read that the white balance should be calibrated to a piece of grass or a tree. This is a practical solution especially for stronger infrared filters (700 nm or 830 nm). However, in order to set the white balance truly neutral, which is even more noticeable with infrared filters of higher initial color saturation, it is advisable to use a part of the image that will be neutral later on. In the simplest case this is a cloud, which should finally be white in the later image. But a white house wall is also useful, or a gray concrete surface.
Channel Swap and Channel Mixer
Once the white balance of the image is set correctly, you will notice that the sky appears brownish and the foliage bluish (depending on the filter). This can definitely be intentional and give nice results, yet most infrared photographers strive to mix this up. To get a blue sky and yellow foliage, it is necessary to swap the red and blue channels. Such a channel swap is possible with any software that has a channel mixer built in, a fairly common tool. The following settings have to be made:
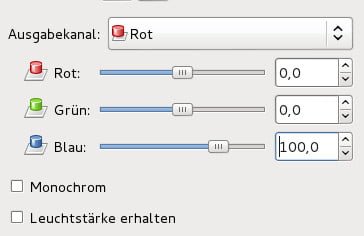
- Select red channel
- Set the red components to 0 and the blue components to 100
- Select blue channel
- Set the red components to 100 and the blue components to 0
Contrast and Dynamic
Often an infrared image does not fully exploit the dynamic range of the sensor, there is even a technical need not to bring the exposure of the histogram to its right edge. Often exposure and contrast have to be increased until the vegetation is just white, but not yet over-exposed on a large scale. This is a balancing act where it is advisable to keep a close eye on the histogram. If you work with a RAW file, life is much easier here.
Advanced Black and White Infrared Processing
White balance can be ignored for the most part when shooting monochrome. Nevertheless, a roughly correct white balance is necessary to obtain high-contrast and nicely rendered black-and-white images. For black and white conversion it is usually enough to set the saturation to 0 with any tool.
Advanced users can also perform the white balance conversion with the channel mixer. If the white balance is set correctly, you have more control over the brightness of the sky and vegetation. In my experience, however, it is sufficient to do a simple desaturation, the differences are minor. By the way, a final color toning (e.g. sepia) can give the image the icing on the cake.
ColorKEy Editing in IR
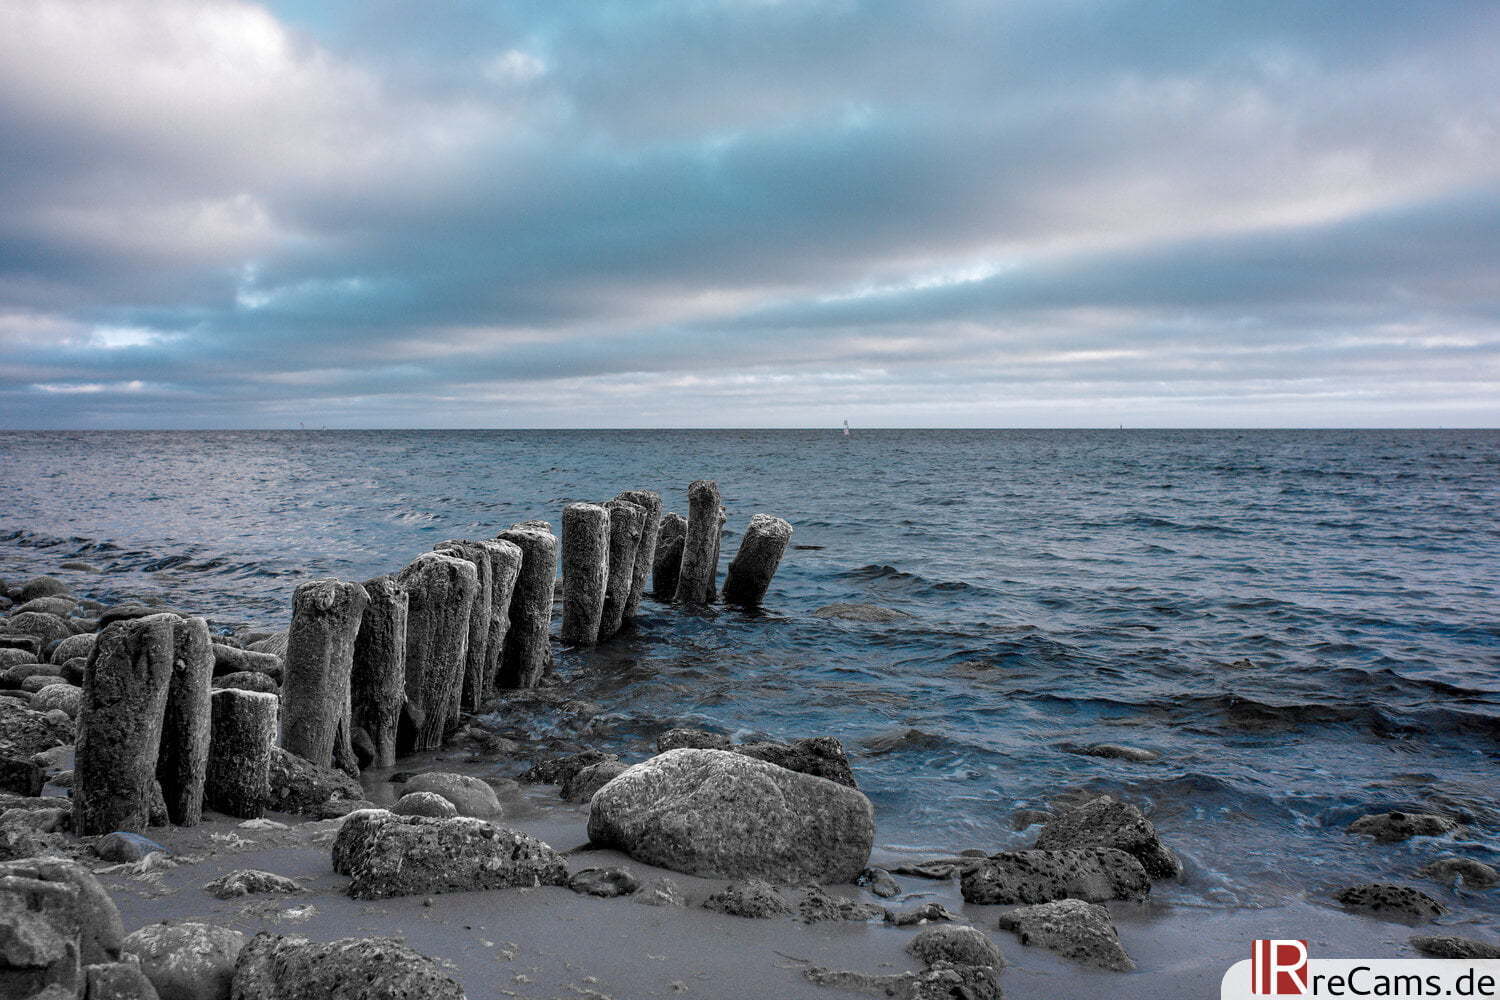
Finally a color key is also popular, that is a combination of color and black and white. Some image editing programs already have a function built in that gives a more or less good result with one click. Alternatively, and to keep more control, simply copy a layer in the image editor and desaturate only the top one (or the other way around, according to taste). Now a layer mask is applied to the top layer and all areas that should be colored are "painted out" with black, therefore made transparent. In these areas the colored version from the lower layer is now visible. It is even easier with the program darktable and its extensive mask functions (see below).
darktable for Infrared Editing
My advice for infrared post-processing is the open source program darktable. This free program for developing, editing and sorting RAW files is available for all platforms and offers all the tools you need for infrared post-processing. You can dive very deep into darktable because it has a huge feature set. Of course, it is necessary to take the time to learn it, but I promise it will be worth it.
darktable is not only suitable for IR photography, also for "normal" photography all necessary tools are available. There is no need to use any other programs, there is no need to save the image in order to process it with another program. A great strength of darktable is the range of tools combined with various drawn and parametric masks (also known as luminance and chrominance masks) that allow highly controlled processing of image areas.
I have already made many editing videos for darktable and am always looking for new "image donations" for more episodes. The videos can all be found in the blog section of IRreCams. By the time of writing they are available in German only, but this might change soon.