
Using a normal digital camera for infrared photography is theoretically possible, but actually not recommended. Only an infrared conversion opens up all possibilities and allows high quality images. But why does infrared photography not work with normal cameras and what are the different possibilities for DSLR and mirrorless digital cameras?
How digital cameras work
The sensor of a digital camera has, in contrast to our eye, the ability to "see" in the infrared range. Modern digital cameras with CMOS or CCD sensors are usually sensitive between 350 nm and 1200 nm. For even longer wavelength of infrared radiation, there are special thermal imaging cameras whose sensors are not based on silicon. So what we record with IR photography, the near infrared radiation, has nothing to do with heat.
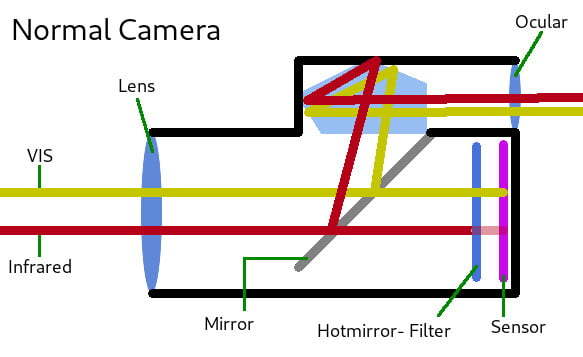
Camera manufacturers purposely install a filter in front of the sensor that only allows the VIS range onto the sensor and blocks both UV and IR.
The so-called hotmirror filter makes a great contribution to image sharpness and color reproduction in classic digital photography. For infrared photographers, however, this filter is a pain in the neck.
Infrared Photography with screw-on filter
Fortunately, the hotmirror filter of some older camera models does not block 100% of the IR spectrum. To test your own camera, you can hold a remote control in front of the lens and press as many buttons as possible. Does the infrared diode light up visibly in the picture? If yes, it is possible to use this camera with an infrared screw-on filter in front of the lens.
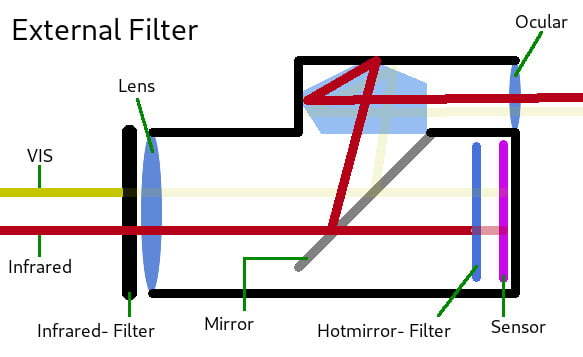
The additional filter blocks visible light, allowing only light above a certain wavelength (typically 700 nm) to pass through.
Unfortunately, there is still the hotmirror filter, which blocks a large part of the IR light. As a result, on a sunny day outdoors, we have to take very long exposures (in the range of seconds) and absolutely need a tripod. It is additionally important to know that there is a focus shift in the infrared range. For more details, see the section "Lenses and Image Errors". Since the IR filter is in front of the lens, and we cannot see through it, it is impossible to adjust the image composition or set the focus correctly without several test shots. Even with LiveView, this is usually a problem because very little light hits the sensor.
Full Spectrum Conversion
So why not just throw out the hotmirror filter? It blocks almost 100% of the IR light on modern camera models, so infrared photography with a screw-on filter is not really an option. While it's not a good idea to just remove the filter (because then the focus position shifts completely), you can replace it.
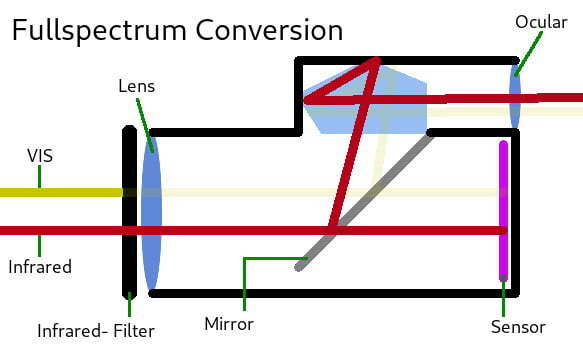
Ba installing a "clear glass" that allows UV, VIS and IR to pass, we speak of a full-spectrum conversion. To photograph in the IR you need additional screw-on filters.
A camera converted to full spectrum has the advantage that it can be used very flexible because all different infrared filters can be screwed on to the lens. With such an infrared conversion (also called undefined conversion) you can choose to photograph in the UV, VIS or IR range. With the correct filter, you can even take normal pictures in the visible range again - as if there had been no infrared conversion at all. Thereby one receives with both IR screw-on filters and Hotmirror screw-on filters usual short exposure times.
With an DSLR camera, you are unfortunately forced to compose the image and adjust the focus via the LiveView function. A full spectrum conversion is especially recommended for mirrorless cameras. Unlike with a DSLR, the viewfinder can be used as usual and autofocus and exposure metering also work without restrictions.
Dedicated infrared conversion
For ambitious infrared photographers who know exactly what they want, the first choice is a completely converted infrared camera. Installing the IR filter directly into the camera has advantages especially with DSLRs. Image composition in the bright viewfinder is possible, even if the picture doesn nor looks like infrared yet (of course). The autofocus is corrected during a professional infrared conversion and can therefore be used as normal. The exposure metering works after the conversion just as before. Only an exposure correction must be set depending on the shooting conditions.
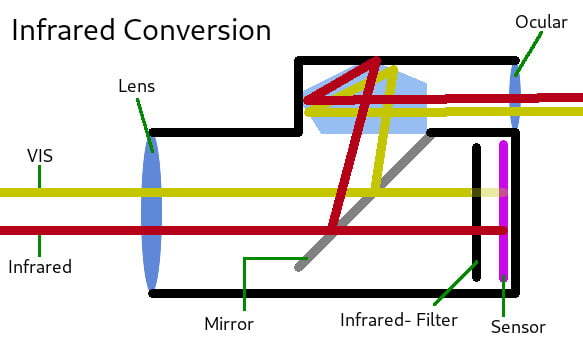
The hotmirror filter is replaced by a infrared filter, so that only infrared light hits the sensor. An external screw-on filter is not required.
After an infrared conversion, the camera photographs exclusively in the IR range. This allows the usual short exposure times, of course handheld. However, you cannot take "normal" pictures in the visible range with such a camera. Nevertheless, depending on the built-in filter, other screw filters can be combined if necessary. An overview of the compatible filters can be found for each screw filter in the Shop.
The true costs of digital infrared photography
The removal and replacement of the blocking filter is a technically complex act, professionally executed it is an investment that cannot be overlooked. In addition, a camera must be "sacrificed" for this, which can no longer be used for anything other than infrared photography. Without downplaying that, a camera conversion is a commitment. Unfortunately, there are no feasible alternatives for exchanging the blocking filter if you really want to achieve high-quality results.
Camera manufacturers are bringing new technology to market at ever shorter intervals. Many of us still have an older camera model at home that is little used, although it still delivers great image quality. But selling the old cameras is hardly profitable anymore. With an IR conversion, this camera is given a second life. And be honest: how much money have you invested in your lenses? An infrared camera offers much more creative possibilities than "just" a single lens, and that is true for all your existing lenses.